
How To Implement Wireguard-Easy On Your VPS
Welcome to the not so ultimate guide on setting up wg-easy on your VPS. If you’ve ever wondered on how to spin up a VPN in matter of minutes, you’re in the right place. This setup is suitable if you want a private gateway to access internal tools, databases or services hosted on your VPS.
Why You Need a VPN for Private Resources?
Imagine you’ve deployed critical services on your VPS—like a private database, internal API, or admin dashboard. The last thing you want is to expose these sensitive services to the public internet. That’s where a VPN shines:
- Secure Access: Only authenticated users can access private resources.
- Isolated Network: VPNs keep your services on a private network, away from prying eyes.
- Convenience: Once connected to the VPN, you can use private services just like they’re on your local network.
Try to imagine (again) for this scenario
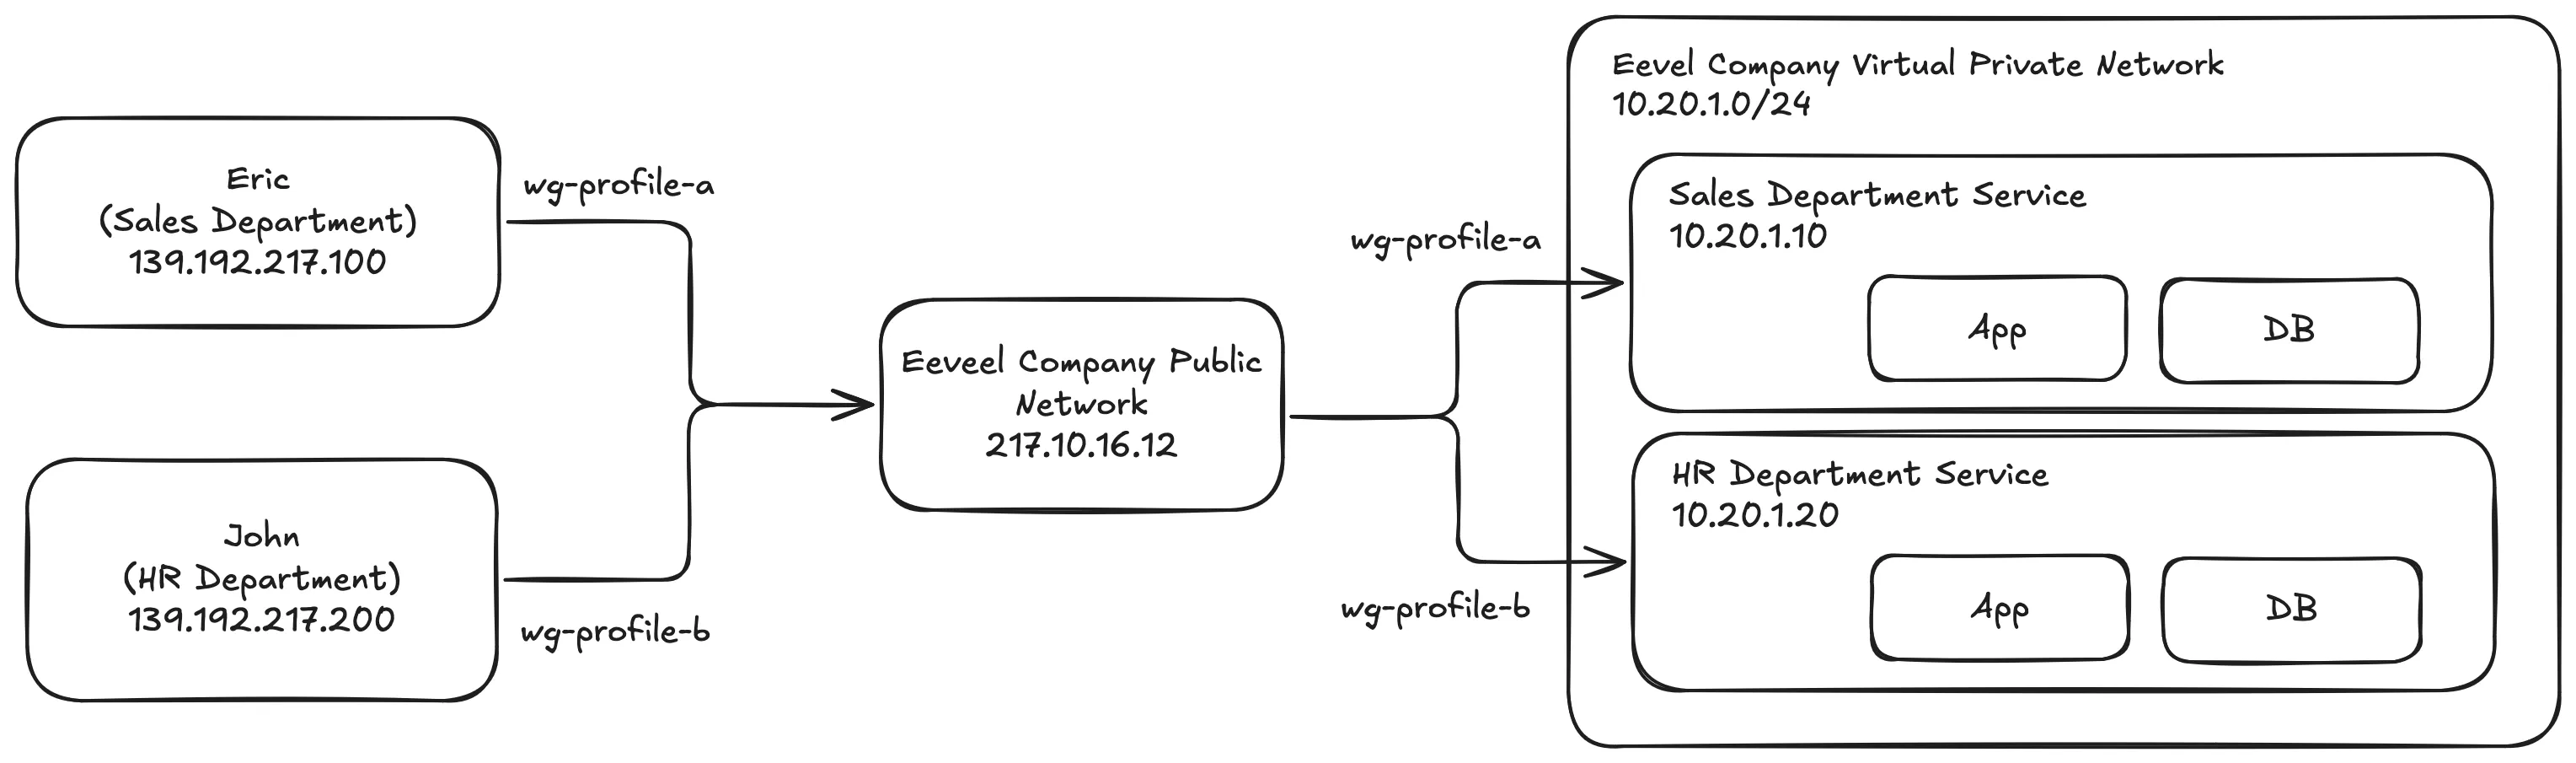
Let’s say there are two employees working at Eeveel Company. Eric works in the Sales department, and John works in the HR department. The company operates from 9 AM to 5 PM, but because both Eric and John have tasks that are not yet completed, they need to continue working from home to finish their assignments.
Instead of accessing Eeveel Company’s private resources directly through the public network, the IT administrator provides them with WireGuard VPN profiles (wg-profiles) to securely access their respective department’s private network. This ensures that each employee can only access resources based on their role and department.
By using this setup, the company’s private resources remain secure and are not exposed to the public network. Both Eric and John can access the private network as if they were in the office, connected to the local network via LAN or Wi-Fi.
What is WG-Easy?
WG-Easy is a dockerized solution that simplifies managing WireGuard. With WG-Easy, you could easily set up and manage a WireGuard VPN and they already have built in web UI to add/remove VPN clients and monitor traffic.
How to Implement WG-Easy on Your VPS
Here’s how to deploy WG-Easy on yout VPS to create secure, private network.
Prerequisites
- A VPS with Docker installed
- A public IP address for your VPS or host/domain
# docker-compose.yml
services:
  wg-easy:
    environment:
      - LANG=en
      - WG_HOST=YOUR_VPS_IP_ADDRESS or YOUR_VPS_HOST
      - PASSWORD_HASH=$$2axxxxxxxxxxxxxxxxxxxxxxxxxxx
      - WG_DEFAULT_ADDRESS=10.20.1.x
      - WG_ALLOWED_IPS=0.0.0.0/0, ::/0
      - UI_TRAFFIC_STATS=true
      - UI_CHART_TYPE=1
      - UI_ENABLE_SORT_CLIENTS=true

    networks:
      default:
        ipv4_address: 10.20.1.50
    image: ghcr.io/wg-easy/wg-easy
    container_name: wg-easy-container
    volumes:
      - etc_wireguard:/etc/wireguard

      # Optional:
      # - PORT=51821
      # - WG_PORT=51820
      # - WG_CONFIG_PORT=92820
      # - WG_DEFAULT_DNS=1.1.1.1
    ports:
      - "51820:51820/udp"
      - "51821:51821/tcp"
    restart: unless-stopped
    cap_add:
      - NET_ADMIN
      - SYS_MODULE
    sysctls:
      - net.ipv4.ip_forward=1
      - net.ipv4.conf.all.src_valid_mark=1

  pgadmin:
    container_name: pgadmin4-container
    image: dpage/pgadmin4
    restart: always
    networks:
      default:
        ipv4_address: 10.20.1.60
    env_file:
      - pgadminconf.env
    ports:
      - "127.0.0.1:8888:80"

networks:
  default:
    name: wgnet
    external: true
This is the schema for the configuration above
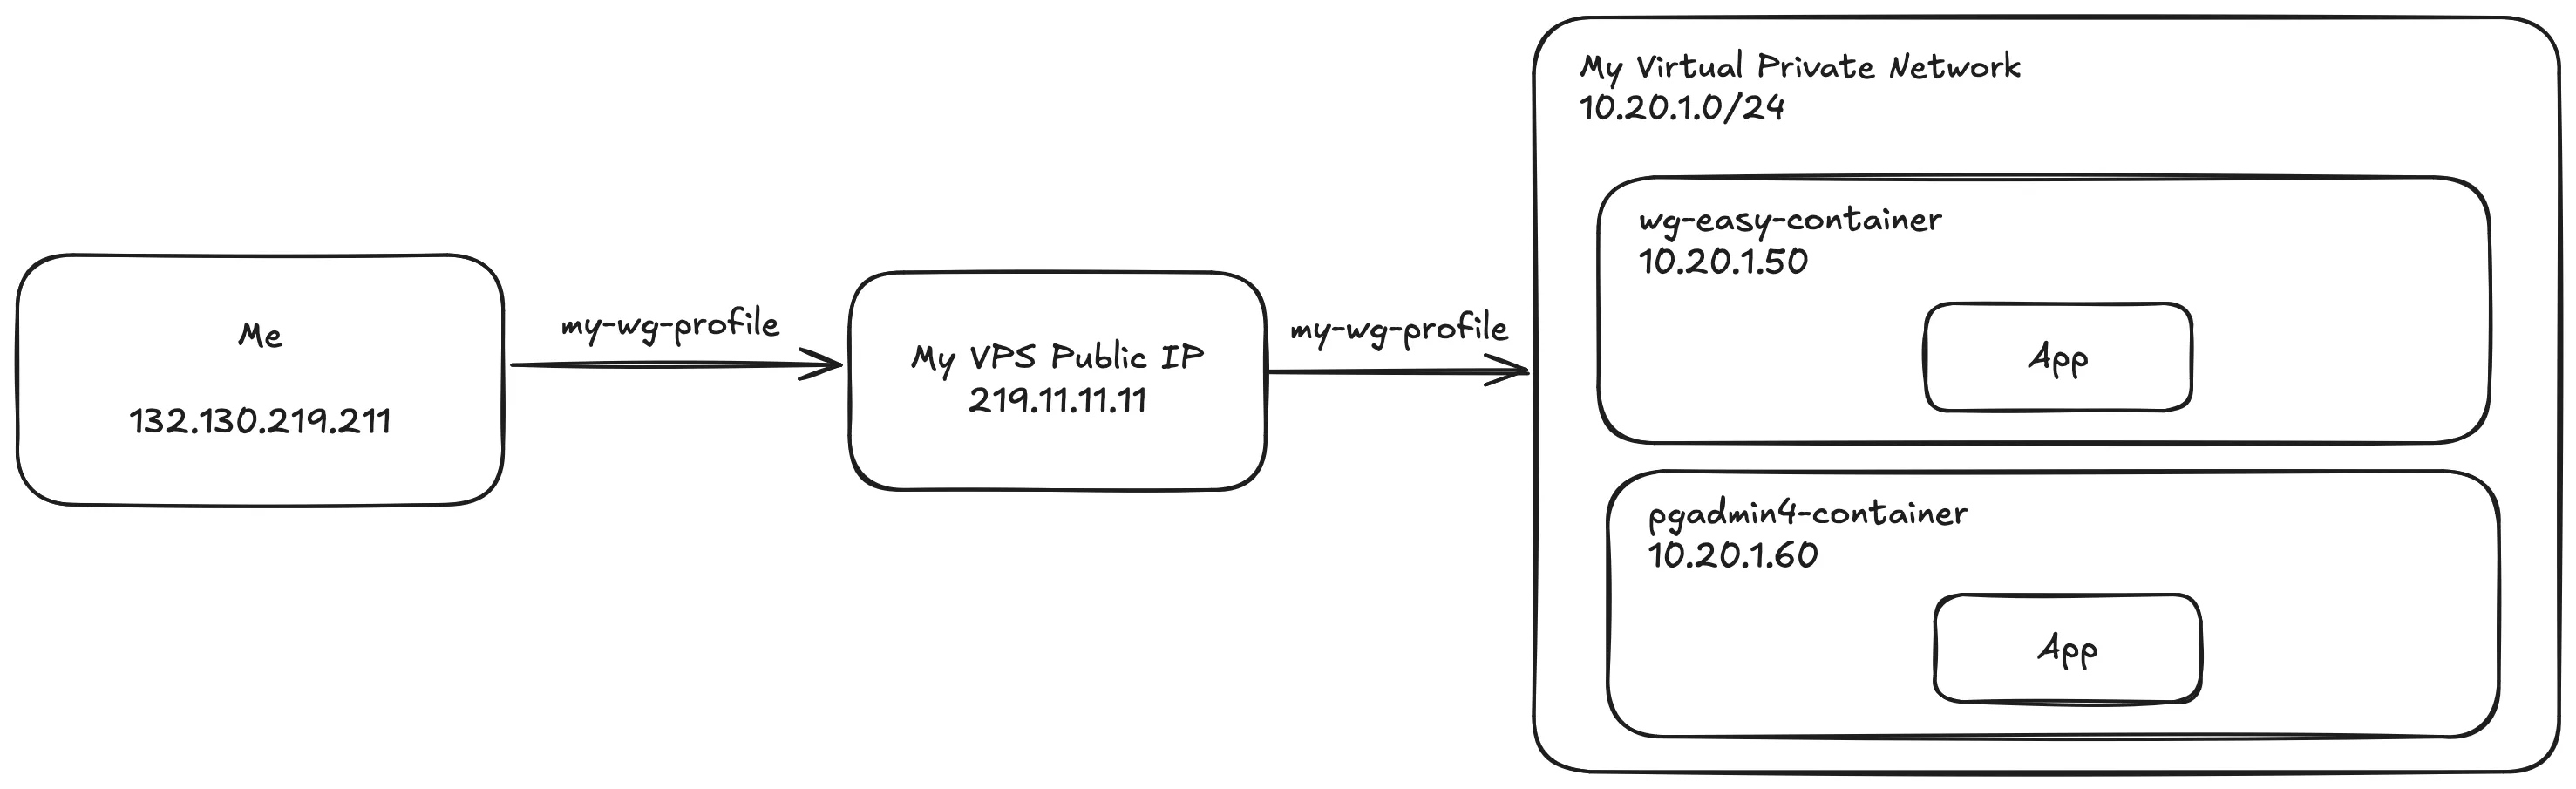
For simplicity, I am using a single WireGuard profile in this example, referred to as my-wg-profile. The rest of the configuration remains the same, except that instead of being restricted to a specific private network, such as the Sales Department or HR Department service, my-wg-profile has access to the entire private network.
The docker-compose.yml defines two services:
- wg-easy: A WireGuard VPN management tool with a web UI
LANG=en: Sets the language for the web UIWG_HOST=YOUR_VPS_IP_ADDRESS: Specifies the public IP or domain of your VPS. This is required for WireGuard clients to connect to the serverPASSWORD_HASH=$$2axxxxxx: Bcrypt hash of admin password for the web UI. Use a bcrypt generator to create this hash for enchanched security. You can generate bcrypt hash here https://bcrypt.online/WG_DEFAULT_ADDRESS=10.20.1.x: Specifies private IP address range for VPN client. Each client reaceives an address from this range. For example10.20.1.10,10.20.1.12,10.20.1.14, etc.WG_ALLOWED_IPS=0.0.0.0/0, ::/0: Determines the IP ranges that clients can route through the VPN.0.0.0.0/0routes all IPv4 traffic, and::/0routes all IPv6 traffic. I use this rule because whenever I connect to my WireGuard VPN profile from my home network, the traffic is routed to the private network.UI_TRAFFIC_STATS=true: Enables traffic statistics in the web UI, letting you monitor data usage for each clientUI_CHART_TYPE=1:0disable charts.1line chart.2area chart.3bar chart.networks: default: ipv4_address: 10.20.1.50networks: Assigns the container to the customwgnetnetwork (defined at the bottom of the file).
ipv4_address: Assigns a static IP address (10.20.1.50) within thewgnetnetwork to thewg-easycontainer.image: ghcr.io/wg-easy/wg-easy: Specifies the Docker image to user forwg-easyfrom the Github Container Registry (ghcr.io)container_name: wg-easy-container: Sets the container name for easier identificationvolumes: - etc_wireguard:/etc/wireguardvolumes: Maps theetc_wireguardvolume toetc/wireguardinside the container. This stores VPN configuration files persistently.ports: - "51820:51820/udp" - "51821:51821/tcp"51820:51820/udp: Exposes the WireGuard VPN port51820on the host using UDP51821:51821/tcp: Exposes the WG-Easy web UI on port51821
Add capabilitiescap_add: - NET_ADMIN - SYS_MODULENET_ADMINthat allows network-related operations like modifying IP forwarding settings andSYS_MODULEto allows loading kernel modules.
Add system controlssysctls: - net.ipv4.ip_forward=1 - net.ipv4.conf.all.src_valid_mark=1net.ipv4.ip_forward=1to enables IP forwarding, which is essential for routing traffic between VPN and external networks.net.ipv4.conf.all.src_valid_mark=1is to ensures routing is correctly marked for source-based policies
- pgadmin: A web-based administration tool for PostgreSQL
Definespgadmin: container_name: pgadmin4-containerpgadminservice for managing PostgreSQL databases and assigns the container name as pgadmin4-containerimage: dpage/pgadmin4: Uses the official pgAdmin image from Docker Hubrestart: always: Configures the container to always restart if it stops unexpectedly
Connects the container to thenetworks: default: ipv4_address: 10.20.1.60wgnetnetwork with a static IP address of10.20.1.60
Loads environment variables from the pgadminconf.env fileenv_file: - pgadminconf.env
Maps the container’s portports: - "127.0.0.1:8888:80"80(default pgAdmin port) to the host’s port8888, restricted to localhost (127.0.0.1)
Defines custom Docker network# Networks Configuration networks: default: name: wgnet external: truewgnetas an external network and allows multiple containers to communicate within the same private network.
Pay attention to this line of code
pgadmin:
...
ports:
  - "127.0.0.1:8888:80"
By default, docker will overwrite your IPtables, so docker will expose the service to the public IP address. By specifying 127.0.0.1:8888:80 the pgadmin can’t be accessed through public IP by 219.11.11.11:8888. Instead, it can be accessed in two ways:
- Direct access inside VPS
Type this command to your VPS terminalcurl http://127.0.0.1:8888. The output will be like this<!doctype html> <html lang=en> <title>Redirecting...</title> <h1>Redirecting...</h1> <p>You should be redirected automatically to the target URL: <a href="/login?next=/">/login?next=/</a>. If not, click the link. - Access with VPN Profile
Log in to your WireGuard dashboard atYOUR_IP_ADDRESS/HOST:51821and create a new profile. Next, download the WireGuard VPN client and import the profile. You can download the WireGuard VPN client from here WireGuard Client. Once connected, try accessing10.21.1.60:80. The pgAdmin web UI should appear.
Final Words
Thank you for reading my blog! I’m still a newbie in networking, server management and devops, so I aplogogize if there are any mistakes or inaccuracies in this guide. I’m constantly learning and would love to improve.
If you want to tweak it further and learn more about WG-Easy, you can check out the official documentation here https://github.com/wg-easy/wg-easy.